Thursday, November 12, 2009

thermoforming!

For our mass pro class we learned about thermoforming. Now that I know about it and its process, I see it being used everywhere.


Anyway for our group, we decided to make a food box. We picked the logo design for this year's tee-shirt, put it in CAD and sent it to the CNC machine. I was pretty glad we did it that way because the CNC is so much faster and you can get all sorts of cool things cut out of the wood vs making the mold by hand (which is what many of my classmates were doing)
The first time seeing the thermoforming machine work its magic was was soooo fascinating. After the 6th time however, not so much. Actually, for our first trial run of the lid, we couldn't get the plastic off the mold. All three shop technitions had to pull on it...Two holding the plastic and one holding the wood mold. In the end I think we had to cut it out. From then on, we used a demolding spray thing which helped a LOT. hehe.


Teagan!

I''m slowly trying to restock this blog lol, so to continue the story, I ended up choosing the name Teagan. Partly because it has the word Tea in it, and partly becauase I was listening to Teagan and Sara and talking to my friend Sara.

Anyway, here are my final boards. I wish I pushed the idea further, but I think I would have discovered that it was already manufactured or on its way to be manufactured by somebody else. Because this year I found someone with the exact same product -- in material and proportion. : (    great minds think alike? maybe?

problem statement, specs, use cycle:


I think this also marks the first time I've used hypershot to render and photoshop to add things to my work (like tea and water and leaves).

Tuesday, November 10, 2009

Teagan?

My latest project is to solve an everyday problem. I decided to tackle the tea making process... Anyway I'm currently working on my boards, and I'm in need of a name.. Currently my list has been shortened down to:
*Teagan
*thea
*tia
*toro
*ros
*tummus

Perhaps I should lucky draw it.

Friday, October 9, 2009

Giraffe Elastic Holder


To be completely honest, I wanted to make a giraffe. But, seeing what everyone else had been able to come up with has gotten me wishing I did something else too... I am going to be many giraffes indebt by trading my work for theirs.


making jig, sanding those curves are like pulling teeth

This assignment was just a learning process for using thermoplastic, so I tried all sorts of things. But next time, I'm using a router to cut my acrylic and measuring 3x before cutting 1x so I don't make 5 in order to achieve 2. And, this project was fun. I think everyone enjoyed it. I want to make more ..stuff!

Monday, June 22, 2009

A Study in Pink+ and a bubblegum Narwhal


I had extra paint left over that I had mixed. Why let it go to waste?

Summer events poster, Mealserving Info Brochure

Although this was via voluntary basis, it has proved to be a good opportunity for me to learn inDesign (which is still more frustrating than fun) and Illustrator. Here are a few posters. One was for summer events, and I did three out of six. I only posted the three I did. The second is a brochure about Buddhist food etiquette. enjoy!

Wednesday, January 28, 2009

Door Handle concept sketches (Elanor)

Concept sketches for a door handle, (Elanor). The idea was that doors should be able to be opened even if your hands are full of groceries or dirty from cooking. Therefore if you are left with an elbow or a leg, you would still be able to open it. It also should be easy to clean because as many people know, door handles are dirty!

The first one is mine, and the second one is what I SHOULD do. More contrast, and fear not the black.


Note: In mine, I kept to three shades of gray only, and tried to use the white of the paper.
Next time: draw a center line to help keep in mind the form of the object and be not afraid of the use of black being too dark.

Egg Racer (Francesca the flying fish)

The rules were thus: the vehicle had to be powered by a single elastic band and the egg was to be held by foamcore and gravity and have 2/3rds of it showing. We then raced them down our studio hallway to see which could make the farthest distance. I came in first in the first heat, second in second, and last in my third. However, this project has been very fun!

What I think: After seeing what everybody else came up with, I wish I was even more creative with mine. Creative in the sense of having a more original idea because this "character" already exists. Other than that, I really like the vehicle and it is very colourful. I even enjoyed making it, I felt like I was making a toy or a craft of some sort, rather than homework. Although figuring out the mechanics was a little hard and I admit I despised this project at the very beginning, but with an egg racer with a face like that, how could you be mad anymore? Everybody else's projects were very well done as well. Absolutely none two were alike and each had their own personality to it.

What I've learned: Crazy glue does not work on foamcore well because the foam absorbs everything. Nor does it permanently secure elastic bands. However, crazy glue does work well on the fingers. Another thing to note about crazy glue is that it comes through the paper and dries like a permanent wet stain on the paper. Therefore I had to double layer some of my paper. I think the best glue to secure foamcore with foamcore is glue gun glue. Although I used a gluestick to put the coloured paper on, I moved on to using glue gun glue to stick the rest of the coloured pieces on, and it didn't even dry bumpy like craft glue. Lastly, unlike my cardboard furniture project, I did not do many mini models and went straight to working with the final. Very unlike me because I like to be sure of what I am doing when I am working on my final, but it is easier when you can work with the right sized pieces in your hands. (and it saves a lot of time!)


IDES1000 Final Review

This wasn't for marks, it was just the final year end review of everyone's work. This was mine, except my colourwheel fell. Just imagine it to be hanging where there's a giant hole of a space.

Vehicle Project

This was our major project and it took about two to three months to finish.
First to complete was our paper model, then a hand drawn 30-60 view of the model, and finally a technical drawing and parts drawing.

There was nothing special to the vehicle, our team had to design a maintenance vehicle. I think this was my least favourite project of the term. Although it was a maintenance vehicle our prof did not want us to have a toolbox on wheels, which was exactly what I did here. (he mentioned when we presented during our critique) So here is a one seater maintenance vehicle with a warning light to tell pedestrians to move out of the way and a jumbo toolbox and shelving/storage units and space for ladders and such.

I'm not posting the 30-60 drawing because it is awful.

And the other pictures are of the technical drawing and parts drawing, which does not look like it will take a long time to complete, but actually requires about 18 hours to accomplish.

parts drawing, technical drawing


paper model. (the railing is not supposed to be crooked)

Cardboard furniture (Night Table) and Invitation card

Yes, my apologies once again. I haven't updated in ages. The final month of school was very crazy with the less than normal amount of eating and sleeping, and more than average amounts of working and going nuts.

Below is my cardboard night table, Chester, it is a very simple design that consists of only three pieces and does not require glue to assemble. The mini ones were all my maquettes and models.

What I think: I personally don't really love it, but it is simple, and I enjoy how it doesn't require a lot of material. My theory is that if I don't think I'd want to buy it and use it myself it's not good enough (It's probably a bad/flawed theory since we're supposed to be designing for the people and not just ourselves ha). However, I've been receiving a lot of feedback from other people and they tell me they absolutely love it.

What I've learned: 1. don't use half scale. apparently, it is sort of inaccurate that way. 2. work on the full scale model if possible. The reason why I had so many small miniature models was because there was a problem with the strength of the cardboard, which I had spent many days trying to fix with tabs and et cetera. So when the time came to try it full scale, the problem ceased to exist. (at my bitter joy)

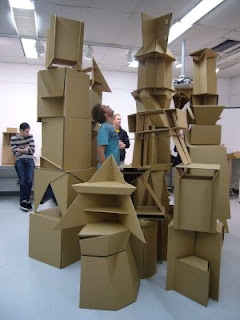
The second picture is of everyone else's project.. stacked!


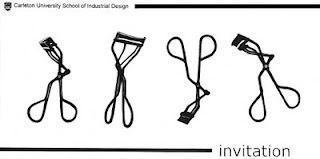
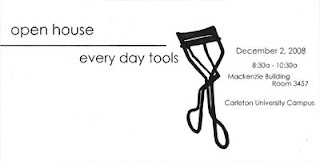
Our graphics assignment was to create an invitation for people to look at hand tools using the hand tool we had in the previous hand tool assignment: